Day 38: 'Tis the Season for Homemade Gifts!
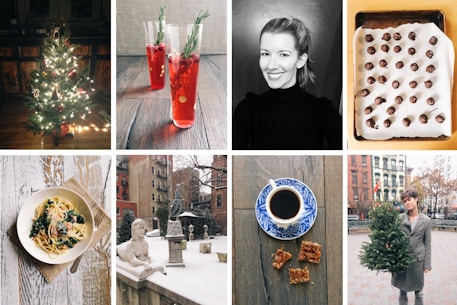
Happy Friday everyone!!! Yesterday, Signe and I had a crazy-awesome shoot. We got through 8 recipes (including the truffles pictured here) and two party scenes, and the pictures she took were just gorgeous. It's so fun hustling and creating and seeing the images flash up on the computer monitor as we go. It really feels like our work is beginning to pay off, little by little!
I've made multiple batches of truffles this week - some for a friend's office party, some for the photo shoot, and some for friends. Which got me thinking how sweet it is to give - and to receive - homemade gifts at this time of year. I remember some good friends coming over last year and bringing us a big mason jar full of homemade Chex mix. A little twine bow and a simple little tag were all that adorned the gift, but it meant so much to me because it was handmade with love. It didn't cost much, but it took time - which these days is often more more valuable than money.

So I have a challenge for you all (and myself!). This weekend, let's all make something homemade - it could be these truffles (recipe below), a loaf of cranberry orange bread, or just some chocolate chip cookies - and surprise a friend or neighbor with it. The wrapping doesn't need to be elaborate. A little bag and a bow (or a mason jar for granola) are all you need. It's the thought, and the effort, that counts. Pick someone that will be genuinely surprised that you'd think of them. It could be an elderly neighbor, a doorman, or a friend you don't see often...seek them out to make their day special.
This is also a perfect activity with kids, as it's not only fun to spend time together in the kitchen, but it also teaches them the importance of giving. And the fact that gifts don't all have to be bought - that some of the most special ones are made by hand. Maybe even have your child write a little note to accompany the present...they'll really feel like they had a big part in the process!

Here are a few suggestions to get you started:
- A jar of spicy maple-rosemary glazed nuts
-A jar of homemade granola
-A bag of pumpkin madeleines
-A bag of chocolate chip cookies
-A box of Nutella-shortbread brownies
-A box of choclate truffles
If you end up taking on this homemade gift challenge, I'd love to see your pictures and hear your stories! Hashtag your pictures #homemadegifts and #theyellowtable on Instagram - I'll feature my favorites on the blog next week. Happy baking and/or truffle-making!!
(Photos by Signe Birck; props from ABC Home.)
DARK CHOCOLATE TRUFFLES 3 WAYS
Truffles are actually really easy to make, it just takes some organization. Make sure to read the recipe all the way through before getting started!
Makes about 28 truffles
Ganache:
8 ounces good-quality dark chocolate* (I prefer between 60 and 70%)
1 cup heavy whipping cream
Dipping Chocolate:
5 ounces good-quality dark chocolate (I use 85% here)
Toppings:
Crushed roasted salted pistachios
Cocoa powder
Flavored sea salt (I used rose sea salt)
Finely chop 8 ounces of the chocolate and place in a large, heatproof bowl. Bring the cream to a simmer over low heat. Pour the hot cream over the chocolate. Cover with plastic wrap and let sit for 10 minutes. (Don't stir before 10 minutes - it will make the chocolate grainy!)
Whisk the chocolate and cream until smooth. Pour into a glass or metal loaf pan or small casserole dish. Place in the refrigerator to harden, about 1 hour. (Once it's cooled a bit, you can cover and even keep overnight if you need extra time.)
Prepare a sheet tray with parchment paper. Using a mini ice cream scoop or a teaspoon, scoop the truffles out into roughly 1 inch balls (or slightly smaller) and roll with you hands to make smooth. This gets really messy, so wearing plastic gloves helps! Otherwise, have a damp rag near by so you can keep wiping off your hands as you go.
Once the ganache balls are shaped, place the tray in the freezer for about 10 minutes to firm up while you prep the dark chocolate and other toppings.
Finely chop the remaining 5 ounces of dark chocolate and place in a microwave-safe container. With the power on 70%, microwave the chocolate for 30 seconds at a time, stirring after each time. This will probably take about 3 minutes total. Melting the chocolate this way will make sure it stays smooth for dipping.
Prepare your other toppings in little bowls and pour your your melted chocolate into a shallow bowl. Prepare another parchment-lined baking sheet.
Bring out your truffles and start the fun! The simplest ones are the cocoa- covered ones: simply roll the ganache balls in cocoa powder and shake to remove any excess.
For the rest, drop the balls one at a time in the melted chocolate and gently lift them out with a fork, letting the excess chocolate drip into the bowl. Place the truffle on the parchment-lined baking sheet and either sprinkle with a few grains of course sea salt or roll it in crushed pistachios (toasted coconut would also be delicious). Then set on the parchment to harden for about 5 minutes. Continue to make your truffles - it's fun to make a variety to give to people.
Store your truffles in an airtight container for up to 3 days. The cocoa-covered ones have a tendency to get soft quickly, so I recommend keeping those in the refrigerator.
*Valrhona chocolate is my favorite for truffles!